Q: Does Dinkleboo offer specials and how do I find out about them?
We sure do, and finding out about them is as easy as signing up for our newsletter.
Sign Up and Save (Click Here)
Q: What payment types do you accept?
We accept Master Card and Visa or Paypal.
Q: Can I alter my order once it has been placed?
Unfortunately you can't change an order once it has been placed as our system is automated and production of your finished product begins almost straight away.
Q: How long does it take to produce my order?
It can take up to 2-5 business days for us to create your order.
Q: How long does delivery take?
Once we are ready to ship your order it will take between 7-10 business days for delivery in Australia & USA. Deliveries to the UK, Canada and rest of the world will take between 10-21 business days depending on where you are in the world. During heavy promotions or holidays delivery times may vary from these standard delivery times.
Q: Are there any customs duties or extra fees?
Orders that are shipped to countries outside of Australia may incur import taxes, customs duties and fees levied by the destination country. The receiver of an international shipment may be subject to such import fees, which are applied once a shipment reaches your country. Customs may charge additional fees for clearance and these must be borne by the recipient. Dinkleboo has no control over these charges and cannot advise what they may be. Each country has its own customs policies and these vary widely. Please contact your local customs office for further information. When customs clearance procedures are required, it can cause delays beyond our original delivery estimates.
Q: How do I contact Dinkleboo?
We can be contacted by phone, email and live chat.
Contact Us (Click Here)
Q: Are name labels dishwasher, microwave oven or steriliser safe?
Yes, however when using a dishwasher, labelled items should be placed on the top shelf and the dishwasher should not be set on "high temperature" settings. We do not recommend placing labels on items that are used in microwave ovens or bottle sterilisers.
Q: How many Labels will I get?
Rectangle Labels come in a pack of 48, The Mini Name labels come in a pack of 76, The Round Labels come in a pack of 45, The Shoe dots come in a pack of 18 and the Iron on Labels come in a pack of 44.
Q: How can I pay with My Credit Card, I can only see a Paypal option?
Please click on the Paypal option, if you scroll down you will see “Pay with Credit card/Visa Card”. This will allow you to pay for you order with a Credit or Visa Card. You will not need a PayPal account.
Q: Is tracking available on my order?
This can depend on the shipping method that you have selected at the checkout and where you are shipping your order to. Please see more details in the Shipping and Tracking Page. International order will not have tracking available.
Q: Can I add to my order once it has been processed?
Unfortunately you cannot add to your order as our system is automated and production of your finished product begins almost straight away.
Photo Book FAQs
Q: What Images can I use for a Photo Book?
We recommend using Jpeg images that have a file size of about 1mb for a Photo Book. You can use Instagram or Facebook images, however we do recommend that you use them as a collage or 4 photos to a page; these images can appear blurry or "pixelated" if used on a full page as the resolution is low.
Q: Do I need to create an account?
Yes, you do need to create an account when you are creating a Photo Book. This is to allow you to upload and save your project to your account, and also means if you would like to save your project half way through creating your book you can. It is also handy for reordering extra copies of your Photo Book as you can simply add it to your cart.
Q: How do I edit text for my Photo Book on my phone?
Touch the text area and it should bring up the text box. To delete the text box, click on the element, then select transform, then click and drag the element off the page and a little trash can icon should appear to delete it.
Q: How do I delete a Photo or template when creating a Photo Book?
Click on the element, then you can click on the bin button to remove the image.
Q: How do I add a new Photo to my project?
Click on My Photos at the top of the page. Select the album you wish to upload to, and then select upload. Click on Local Drive, Facebook or Instagram. Select the images you wish to use and add photos. To go back to your project please click Continue. The new images will be located at the bottom of the album. You will need to manually add the new images to your project.
Q: How do I change Photos in my Book?
Please click on the image, and select remove Photo. You can then go back into choose photo and add a new one that way.
Q: How do I save my Project?
Please click on the disk icon which will save your project. At this stage there is no auto save so please save your project at least every 5 - 10 minutes.
Q: What size should my images be?
We recommend that your images should be between 3-10 MB in Jpeg format.
Q: How do I edit my images?
Click or tap on the photo. You will then see a little hand icon appear, and below that Pan/Zoom and Transform. To rotate, on the left hand side you should see a list of options: Choose Photo, Rotate 90, Remove Photo, Change Layout, Change Theme, Add new Photo and Add new text.
Q: How do I add or delete pages from my Book?
At the bottom-right-hand corner of the editing area of your book you should see two double page icons, one with a plus button and the other with a trash can icon. To add pages click the double page icon with the plus button. Please make sure you add the new pages to the back of the book. To delete pages select the second-last double pages and then click the double page icon with the trash can. Unfortunately you cannot delete the last single page.
Q: How do I autofill my Book?
Please upload all the images you wish to use. We recommend uploading a minimum of 22 images which equates to 1 image per page plus cover for a 20-page book. Once uploaded click Select All and then Continue. This will then place all the images into your book in the order you have uploaded them to your album. Please note you cannot autofill if you use the blank theme.
Q: How do I zoom my images in?
Click on the element, drag or click the + and – sign on the zoom option below the photo to zoom your photo in or out.
Q: How do I add text to my spine or pages?
Please click on the text box that appears on the spine automatically. Enter in your text that you require. To change the font, colour, size etc click the Text button. To delete, click on the box and click on the bin button to remove. Text can only be added to the spine of the Hard Cover Books.
Q: I have a Voucher/Coupon code to use; how do I apply it?
Once your book is in the shopping cart please add your code to the Discount Code area and click on Apply Coupon. The total amount should be reduced. Click on proceed to cart once the amount is correct.
Q: Can I store images?
Dinkleboo allows you to access your images through My Photos. However, please note that:
- We provide Image Storage at no cost in order to facilitate Users' creation and purchase of personalised Products bearing their Images.
- Accordingly, we do not intend or invite Users to store their Images other than for those purposes.
- We are entitled to introduce a policy for the removal of your Image Storage if you do not make limited purchases of personalised Products from us within a 12 month period.
- You should always keep a copy of your original images and make a back-up copy of all your images on your personal systems. We do not undertake or guarantee to keep your images and will not be responsible for the loss of, deletion or corruption of any images. You should not use Dinkleboo as the only repository of your images.
Copyright
Your Copyright
Generally under copyright laws the owner of the copyright in images or photographs is the person who created the images or took the photographs. You represent and warrant to us that you are the owner of the copyright or have the express permission of the owner of the copyright in the images or photographs which you submit to the service. We claim no ownership rights in any images or photographs submitted to the service. Solely for the purpose of enabling your images or photographs to be uploaded and made available on the service and to fulfill print orders made for your images and photographs you grant to us and to any store which fulfills print orders of your images or photographs, a perpetual worldwide non-exclusive transferable royalty-free copyright licence to copy, reproduce, display, modify, adapt or alter, transmit, communicate and distribute to our staff your images or photographs. You acknowledge that we have no control over the use of your images or photographs and shall not be held liable for any use, publication or copying of your images and photographs. You waive all rights of action or other claims you may have against us in respect of any such use, publication or copying.
Copyright Claims
We respect the intellectual property rights of others. In the event that we receive a written complaint alleging copyright infringement by a member, we will refer the complaint to the member concerned. It is the member's responsibility to resolve any such complaint. Should the member not resolve the complaint satisfactorily and advise us, in writing, of the resolution within seven (7) days of the date on which the matter was referred to the member (the "Referral Date"), we reserve the right, in our absolute discretion, to suspend the membership until such time as the matter is resolved. If we have not been notified within sixty (60) days of the Referral Date that the matter has been satisfactorily resolved, we reserve the right, in our absolute discretion, to terminate the member's membership.
Voucher Help
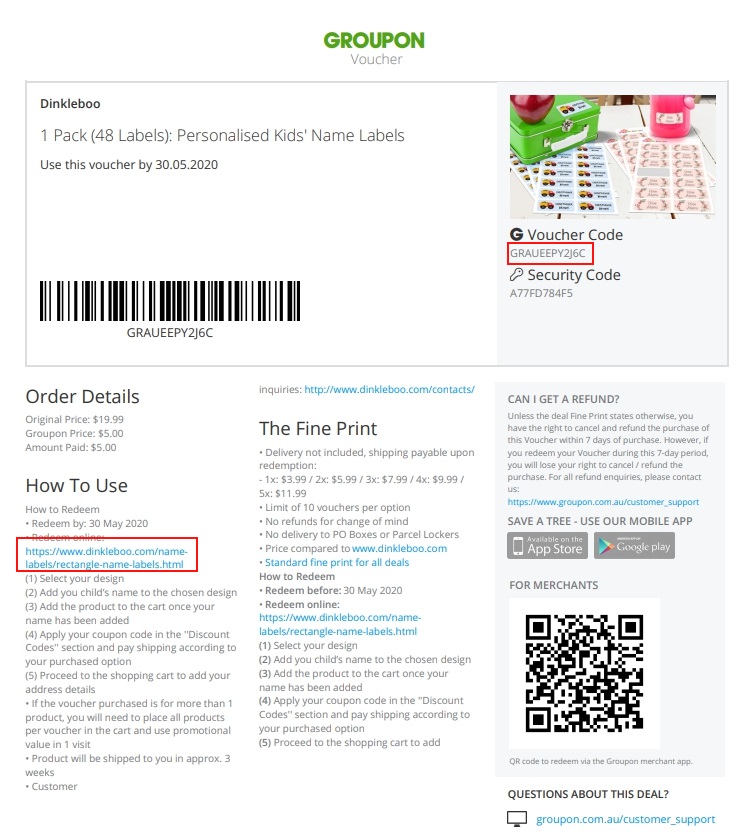
1. Click on the MY GROUPON Tab in your Groupon account to locate your Groupon Purchase
2. Click on the Purchase to access the Voucher details
3. Click on View Voucher
4. Please click on the link provided in the voucher to access our website
5. Please select the item you have purchased
6. Design your order and add in all required fields
7. Click the preview button to review the order to ensure this is correct
8. Click Add to cart
9. Access the cart button up the top right hand side of the site
10. Check your order details and scroll down to the Discount Code box
11. Please copy and paste the code located on your Groupon Voucher into the box and click Apply Coupon
12. Check that the price has been reduced and click proceed to checkout
13. Add in your shipping address
14. Select shipping method you require
15. Select payment method your require
16. Click Place Order Now
17. Pay for this shipping and complete your order
If you have any troubles or have any questions please do not hesitate to contact us for help.
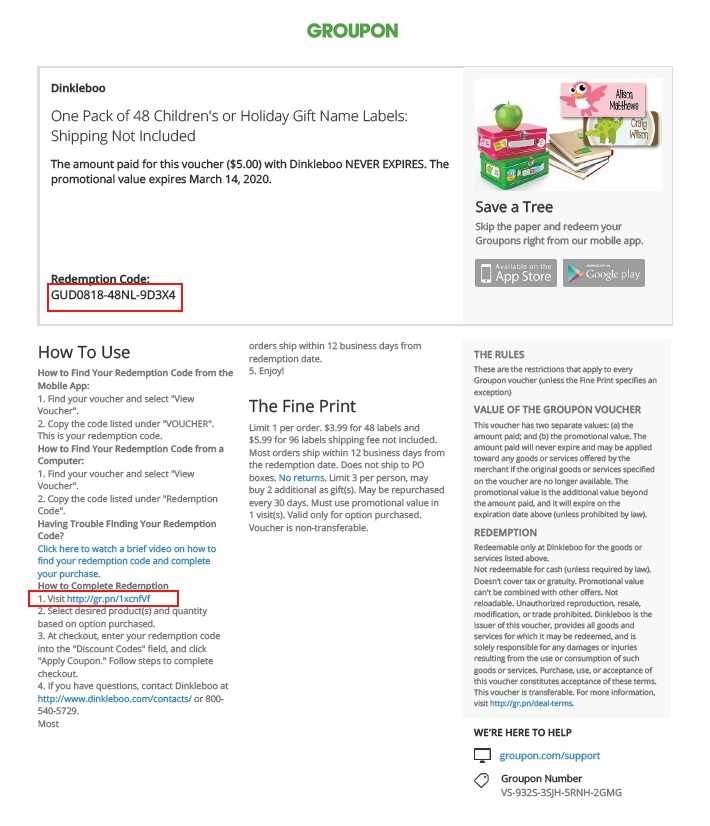
1. Click on the MY Stuff Tab in your Groupon account to locate your Groupon Purchase
2. Click on the Purchase to access the Voucher details
3. Click on View Voucher
4. Please click on the link provided in the voucher to access our website
5. Please select the item you have purchased
6. Design your order and add in all required fields
7. Click the preview button to review the order to ensure this is correct
8. Click Add to cart
9. Access the cart button up the top right hand side of the site
10. Check your order details and scroll down to the Discount Code box
11. Please copy and paste the code located on your Groupon Voucher into the box and click Apply Coupon. (Please ensure all dashes and numbers are present in the code as shown on the voucher)
12. Check that the price has been reduced and click proceed to checkout
13. Add in your shipping address
14. Select shipping method you require
15. Select payment method your require
16. Click Place Order Now
17. Pay for this shipping and complete your order
If you have any troubles or have any questions please do not hesitate to contact us for help.
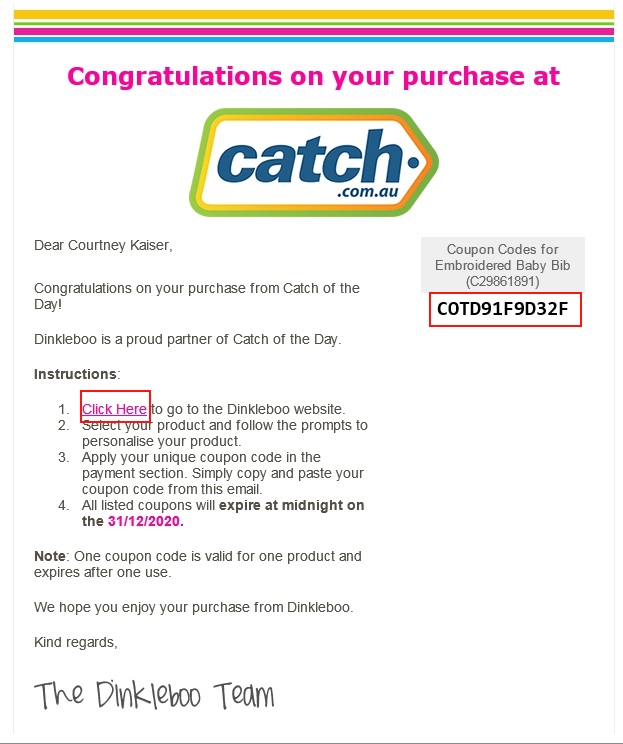
1. Open email from Staging Dinkleboo
2. Please click on the link provided in the voucher to access our website
3. Please select the item you have purchased
4. Design your order and add in all required fields
5. Click the preview button to review the order to ensure this is correct
6. Click Add to cart
7. Access the cart button up the top right hand side of the site
8. Check your order details and scroll down to the Discount Code box
9. Please copy and paste the code located on your Staging Dinkleboo email into the box and click Apply Coupon
10. Check that the price has been reduced and click proceed to checkout
11. Add in your shipping address
12. Select shipping method you require
13. Select payment method your require
14. Click Place Order Now
15. Pay for this shipping and complete your order
If you have any troubles or have any questions please do not hesitate to contact us for help.
Log In
Create An Account
Personal Information
Login Information
Already have an account?


